Luminance Inversion and Color Swapping

In this post, we'll explore basic image processing using C++ to better understand how images are handled at a low level. This series will start with simple concepts to keep things beginner-friendly and approachable.
To begin, we’ll introduce the PGM (Portable Gray Map) format—a commonly used grayscale image format known for its simplicity, making it ideal for learning and experimentation.
Let’s dive in!
PGM Introduction
A PGM file is essentially a text or binary file that describes a grayscale image. You can think of it as a simple recipe for a computer to draw an image using the information it provides. A PGM file begins with a header that contains basic information such as the image dimensions and the maximum grayscale value. This is followed by the pixel data, which tells the computer the shade of gray each pixel should display.
PGM comes in two formats: text-based (P2) and binary (P5). In most cases, we will work with the text format for simplicity. Let’s take a closer look at its structure.
P2
# A tiny grayscale image
3 2
255
0 128 255
6 192 32
Text-based PGM Header - CSY
A text-based PGM file appears as shown above. From top to bottom, the header specifies that the format is text-based, with a width of 3 pixels and a height of 2 pixels. The maximum grayscale value is 255. The values that follow represent the intensity of each pixel, ranging from 0 to 255.
Why use PGM? It offers the following two key advantages:
- Simple and obligates to its original form
- Portable and works on any software
Having briefly covered the data format we’ll be processing, let’s now move on to the core implementation.
Luminance Inversion
This is a basic yet insightful image processing operation. It helps us understand how grayscale images convey information purely through luminance. In grayscale, pixel values range from 0 to 255—lower values indicate darker regions (less intensity or "energy"), while higher values represent brighter areas (more intensity).
The concept parallels physics: brighter stars emit more light, just as higher pixel values signify greater luminance. Internally, each pixel in a grayscale image is stored as an 8-bit integer. Luminance inversion simply computes 255 - value for each pixel, effectively flipping the lightness and darkness across the image.
- 0 = pure black
- 255 = pure white
- 128 = medium gray
To invert the luminance, we simply subtract each pixel's value from the maximum possible luminance. In other words, the new value is calculated as:
New Value = 255 − Original Value
This operation effectively flips the brightness of the image. The reasons for performing luminance inversion can be summarized as follows:
- Data Analysis: inverting luminance can aid algorithms detect edges or features
- Medical Process: flipping luminance might help spot details in X-rays
Luminance Inversion Implementation
Here, we present the core parts of the code snippet. You can find the complete implementation in the codebase. The filters have been separated into a dedicated file named kernel.py for better organization, where you can find more detailed information.
#include "kernel.h"
#include <iostream>
#include <stdio.h>
#include <stdlib.h>

int main(int argc, char **argv) {

  int choice = choose_filter();
  const char *filename = argc > 2 ? argv[2] : "output";

  switch (choice) {
  case 1:
    kernel_callback(argv, filename, luminance_inversion);
    break;
  case 2:
    kernel_callback(argv, filename, channel_swapping);
    break;
  default:
    printf("Invalid selection\n");
    return 1;
  }

  return 0;
}
main.cpp - CSY
#ifndef KERNEL_H
#define KERNEL_H

class Image;

int choose_filter();

void kernel_callback(char **argv, const char *name,
                     void (*filter)(Image *, Image *));

void luminance_inversion(Image *in, Image *out);
void channel_swapping(Image *in, Image *out);

#endif
kernel.h - CSY
#include "kernel.h"
#include "image.h"

void kernel_callback(char **argv, const char *filename,
                     void (*filter)(Image *, Image *)) {
  Image *in = new Image();
  in->read(argv[1]);

  Image *out = new Image();
  out->init(in->getWidth(), in->getHeight(), in->getCH());

  filter(in, out);
  out->save(filename);

  delete in;
  delete out;
}


void luminance_inversion(Image *in, Image *out) {
  int W = in->getWidth();
  int H = in->getHeight();

  in->getInfo();

  for (int y = 0; y < H; ++y) {
    for (int x = 0; x < W; ++x) {
      double value = in->get(x, y);
      out->set(x, y, 255 - value);
    }
  }
}
kernel.cpp - CSY
Make sure to initialize the output image instance; otherwise, the result will be a completely black image. Below are the results of the original image and its luminance-inverted version:
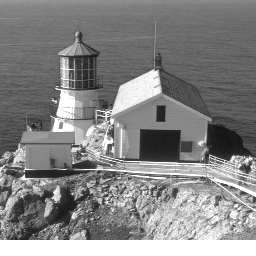
Figure 1: Original
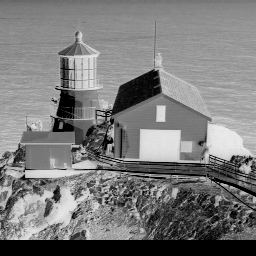
Figure 2: Luminance Inversed
Color Swapping
For color swapping, the key difference lies in the manipulation of color channels. We simply replace the target channel with values from another channel. To visualize the effect, we apply this operation to a PGM-format image containing RGB channels.
void channel_swapping(Image *in, Image *out) {
  int W = in->getWidth();
  int H = in->getHeight();
  int CH = in->getCH();

  in->getInfo();

  for (int y = 0; y < H; ++y) {
    for (int x = 0; x < W; ++x) {
      double r_value = in->get(x, y, 0);
      double g_value = in->get(x, y, 1);
      double b_value = in->get(x, y, 2);

      out->set(x, y, 0, b_value);
      out->set(x, y, 1, r_value);
      out->set(x, y, 2, g_value);
    }
  }
}
Color Swapping - CSY
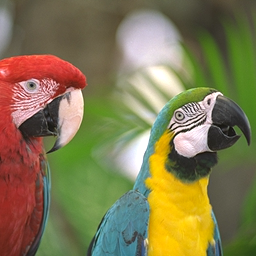
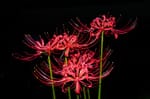
Figure 3: Original
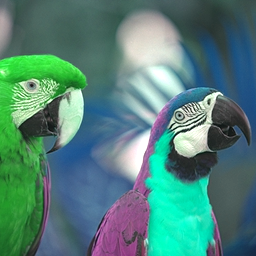
Figure 4: Color Swapping
Conclusion
This is merely an introduction to image processing, yet it is essential to understand the concept of interpreting images as data and its connection to human vision. It offers a powerful insight: what we see is not the only way to perceive the world.
There may be mysterious phenomena or beings that lie beyond the limits of our current understanding.